Sunday, January 30, 2011

Round 9 ORBC...Sewing your Four Quadrants Together....Finally!:)

I sure am loving these wonderfully creative Ticker Tape projects showing up on the ORBC flickr page....you all rock!! For those of you who are making a larger project I guess you want to know how to sew the pieces together!!:) Deep breath.....Ahhhhhh....ok...here we go!
First lay your four quads face down on the bed or floor and if you have directional backing like I did make sure the pieces are lined up correctly. This is how they will be sewn together.
Starting with the center vertical lines formed by the four quadrants, pin the backing and batting over the the left and to the right exposing only the back of the top fabric.
Starting with either the two top pieces or the two bottom pieces put right sides (fronts) together, pin and sew using between a 1/4 -1/2 inch seam allowances ...remembering that this is the flap you left on the edges where you didn't sew any scraps...right?!:) If you have done a lovely design on your quadrants like I know some of you have please check the layout in the front while it is still pinned....then sew!:)
Once you have done that you can unpin those edges and pin the horizontal backing and batting over and then put right sides together matching the center seam, pin and sew these two sections together....now the top of your quilt is DONE!:) If you want you can now iron those seams from the top.
It should look like this....
....and like this.
Now this part might be easier to understand from the photos...I'll try my best to explain....starting with either horizontal or vertical seams put the batting from one side down like I did with the batting on the left side....
Then trim the right side so it butts up to the left side....you can see there at the top of the photo they meet up (just under the scissor blades)....at the bottom of the photo I had just pushed the left batting up and out of the way so I could cut easier.
See...batting to the left in photo down and you can see where it was trimmed on the right.
Next I laid both left batting and backing down, meeting up with trimmed batting on the right side....see at the top? Unfortunately I cropped this photo too much at the top so I hope you get it!:o
Then I took the right backing flap and folded it in half and laid it down going to the left. In this photo I just have it pinched between my fingers.
See, fold the remaining flap in half and over and pin in place.
This is a photo of the horizontal and vertical joint.
Now it's hand sewing time....using your favorite blind stitch.
In this photo you can sort of see where the vertical seam is because of the birds that are missing their faces! But you can't hardly tell where the horizontal seam is located. Once you finish the back seams you can bind the edges like you normally would do it.
I made this quilt with nine sections sewing the scraps on one square at a time then doing the above process to sew all nine squares together. See how nicely the seams in the back are hidden when you don't have a directional fabric for the backing?:)
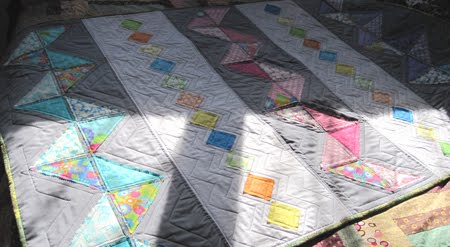
Making this quilt in 12" wide strips was the easiest of all, nothing needed to really match up in the front!:)
I hope this made sense...what's in my head doesn't always convey to the keyboard! If not please don't hesitate to email me or ask on the flickr thread.
I have really had a great time leading this Round 9 of the Old Red Barn Quilt-Along ...it has been an honor and a privilege. I thank you all for your wonderful creations and kind comments!!
Now I can finish this!!
~d


Thursday, January 27, 2011

We Heard a Loud Noise....

....looked out our livingroom window and saw what scared us....poor crepe myrtle!!Don went out to try to save the rest of it! In about six hours we had about 12" of wet heavy snow on the ground, the heaviest we have ever experienced in all our 24 years of living here.
In the light of the morning we saw more destruction...another crepe myrtle that used to have three trucks now has one! So sad....they were so beautiful in the late summer.
Looking around we saw more victims.....
...everything behind the grape arbor is a goner...
....but the biggest mess is down the driveway...those white pines on the right have given up tons of branches....we have a big clean up ahead of us.
But Slate doesn't care....he just wanted to be as high above it all as he could get!
I don't know why he had to come out there...oh yeah...I forgot...he thinks he's a dog and follows us wherever we go around the yard!:)
Back inside, warm, full of coffee and homemade chili, I have robots on the brain....two yards of robots....can anyone think of something fun I can do with them?:)
~d


Sunday, January 23, 2011

ORBC Round 9 A Few Quilting Examples

Greetings All,
Hope everyone in the northern hemisphere is staying warm...it was 8 degrees
(-13.3C) last night!! At least the sun is shining this morning and the wind has died down!
Just a quick post to show you a few ways of quilting some of the Tickers. Of course there is the regular way going around each scrap and some of you are making some amazing stuff using Free Motion Quilting...kudos to you all! Keep it up and don't forget to post on the ORBC flickr page so we can all learn and be inspired!
This little doll quilt shows the very easiest way to do it if you have cut all your scraps the same size and put them in nice rows....do all the vertical and then all the horizontal making sure you start with a center row.
With the zig zag I did the green line first...can you see it...horizontal and vertical lines? Then I did the ZZ which is the purple line and all I had left was one white horizontal line. I'm just showing you how I sewed down my pieces....I figured you can have fun figuring out how you want to do the rest!:)
Lastly the flying geese....I followed the alphabet for each triangle, when I got back to the beginning I sewed over the D to C line and outlined the whole wreath of geese. After that I decided I wanted something in the middle so I sewed on the circles.
You could also do parallel horizontal, vertical, or diagonal lines for a
checkerboard or diamond effect OR you could even do wavy lines! As long as you get some sort of stitching down on all four corners of your scraps they will not wrinkle all up on you when you wash!:)

I think you all are really inspiring me be brave and get out my darning foot!!

This is my next project!!!
~d
Next up...sewing your quadrants...I promise!:)

Wednesday, January 19, 2011

Two QLD Flood Relief Auctions...and a Giveaway!!

Update 1-19-2011: It is just amazing, in just two days the QLD Flood Appeal Auctions have raised over $45,000!!! I am so happy to be a small part of it. Please go visit the button on the right..they are adding new auction/raffles all the time and there is a facebook page where you can see each individual item easier!!
Thank you all for your creativity and caring!! xoxo d
I'll make this brief....our friends in Queensland, Australia are living through a serious flood disaster and Toni of Make it Perfect and her sister are trying to make a difference. I would like to help, in my small way. So here it goes.....I have three small quilts here for the auction. All you have to do is bid on the quilt or quilts of your choice, if you are bidding on more than one please do it in a separate comment. At the end of bidding the two quilts with the two highest bids will be the auction winners and the quilt with the least bids will be given away by Random Gen!:)
Before I forget....click on the QLD Flood Appeal Auctions button over there on the right and it will take you to all the other lovely people around the world that are trying to help with auctions, raffles and sales of their lovely crafts.
Details for my auction are below...so here we go....
Mini quilt #1- Meadowsweet
Mini quilt #2- Blue Hill Toy Box
Mini quilt #3- Island Batiks

All quilts are 100% cotton and between 15 1/2"-17" square.


How this auction works:
1. Bidding will start at $10 (US).
2. You can place a bid by leaving a comment on this blog post with your bid amount, name of the quilt you are bidding on and contact info. Please make sure that your bid is higher than the previous bidder for that particular quilt.
3. If you are bidding on more than one quilt please do it in a seperate comment...and thanks!;)
4. Your bid must be in whole dollar increments.
5. This auction is open to everyone, even International addresses. I will pay for postage!
6. The auction begins NOW and will END at 9pm EST on Monday, January 24, 2011.
7. At the close of the auction, I will contact the winner(s) (please make sure your bid comment includes a way for me to contact you). The winner will pay the winning amount directly into the Premier's Flood Relief Appeal and send me proof of payment via email. Once proof of payment has been received, I will post your quilt and a few surprises to you.
8. I will also use the Random Generator to pick a winner from all of bidders and that person will win the quilt with the lowest bid...so it won't feel like it is last!:) I will contact you via your contact info.
Please, if you don't really want to bid on one of my quilts....that's totally fine....click on the above button and have a look at what else is out there, I'm sure you will find something that is your cup of tea!;)
If you have any questions don't hesitate to email me!
Thanks again, and to quote Toni, "we hope we can make a real difference together."
~d


Monday, January 17, 2011

Scraps Here We Come ORBC Round 9

Are you ready? Fabric sandwiches and Scraps all piled up and raring to go? Ok...LET'S DO IT!!
First of all...and most importantly....NO stitching or scraps pieces 3/4"-1/2" from the edges!! Get that? Either use a washable pen/pencil to mark the edge or use your wonderful imaginations but always remember NO stitching 3/4"-1/2" from the edges of the fabric sandwiches!:)

Yes, you can use your rotary cutter....no you don't have to use pinking shears!:)
So, depending on your design this is how you start....3/4"-1/2" from the edge!
Have I impressed that detail enough?:o Learn from my mistake....the following photos were taken BEFORE I realized I needed to have the batting and backing bigger than the front! I put my scraps far enough away from the edge but my backing shifted a little on one of them and the backing wasn't long enough....you'll see later what I did to fix it!
Put a few pins in the corners and the middle of your sandwich for now and randomly lay out your scraps depending on the design you want to do....
I didn't pin my scraps on....a glue stick was my best friend! I filled up one fabric sandwich at a time and then glued the scraps on.
I laid my four fabric sandwiches on the bed how I was going to stitch them back together so I could see that my rows would line up but really, it doesn't matter if they don't. If you have a certain pattern in mine like 9 patch or checkerboard then yes, you want them to line up. Another good thing about the glue stick is you can unstick a scrap and move it! Also, if you have directional backing like I did with the birdcages make sure your fabric sandwiches are all going in the same direction!
Once I had my final layout I put a few more pins throughout the sandwich. I used straight pins but I did stick myself a lot! Then it is time for sewing them on...see my starting and ending point? That's what you want to do, start in the middle and just go around and around and you won't have puckering.
Starting with a scrap in the middle, at least 1/4" from the edge, stitch all four sides and when you get back to where you started just backstitch a couple of stitches. Then move the sandwich over to the next square and do the same going around and around until you have sewn all the scraps down. This is why I did it in smaller fabric sandwiches because if you try to turn a bigger quilt through your machine for all those small scraps....well....I think we all know it would be a bugger!
Once you have finished all you have to do is snip off the threads!
If you lay out your scraps in perfect rows and they are all the same size all you have to do is go back and forth and up and down each row sewing down the edges like the mini quilt on the right in this photo.
That was half the fun with each different Ticker was figuring out the easiest way to sew the scraps down.
I think I have covered it all in the scrap sewing down stage. If you don't understand something please ask...I see what needs to be done in my head...you can't see what's there....which I guess could be a really good thing!;)
Next up....sewing the quadrants together!
~d
PS...is anyone brave enough to try sewing their scraps down using free motion stitching? I wasn't this time but I am curious!;)


Sunday, January 16, 2011

Alas...the Last of the Ticker Samples!!

Greetings all....last examples here...I really need to start working on other WIPs!!
Last time I showed you the back of a quilt, here is the template I used to get my triangles lined up...thanks for the math dear hubby!

So this nice stack of 13" tops became......

....flying geese anyone?:) Or how about flying geese flowers? Just thought the centers looked a little lonely.
Or how about doing strips and triangles?
These strips became...
....this quilt....
...and after washing, this crinkly lovely!:) I...LOVE....GREY!
I ran out of time...and desire...but I had a few more ideas so I just drew them up on Paint.
Here is an idea shown in the four quadrants.
This is a checkerboard. You can just place your scraps in a checkerboard pattern or even sew different top fabrics together to make a checkerboard and then put the scraps on one or the other fabric. Of course each square can be scrappy or one kind of fabric...I just didn't have time to put different colored little scrap squares in each bigger square....guess they are more rectangular but you get the idea!
Or how about a radiating sun?!:) Yes, you can do this AND you can cut out circles!! My sun is a bit lopsided!
Last but not least a little wall hanging....
...that city building fabric gave me this idea...
....I want to embroider a few things on here like antennae on top of a few of the buildings with glass bead beacon lights.
So...did I give you enough ideas? I have others but figured this was enough!
I leave you with fresh out of the dryer fuzziness...it is keeping me warm right now!!
~d
Tomorrow....laying out your scraps...I promise!